Drilling a Well – The Closest to Gambling You will Get In the Home Build Process

Yadkin WellDrilling for water for your home is about the closest thing to going gambling at a casino as you can get when building a home. Granted there area a number of other items that can have large variances, but, drilling the well can cost a lot of money if you are unlucky.

Although we live in the country, we do have access to County water. The alternative to drilling for the well would be to have a septic system and hook up to county water for about $1,600+. Most of the cost is in the high priced meters that the county requires.  This is the most secure route for cost containment. The cost of the water is fairly nominal too.

So why drill a well for water?

I have lived a number of places. From the Mid-West, Southeast, Northeast, DC, NYC, and Mexico. I have experienced water quality issues and reliability in all of these places. The worst water quality, taste and reliability was ironically in DC. The water tasted horrible, and when DC area experienced a strong storm the power not only eliminated our power, but the power to the city pumps. We were out of water for days. This was almost worse than having no power. Imagine just going a day without water? The things we take for granted like bathing, washing and cleaning anything become very tough if not impossible. So using a well becomes the easiest solution to both reliability and taste.

Why do you compare drilling for a will to gambling?

The biggest variable of drilling for a well is: “How deep will you have to drill?”  There is no easy and sure answer to this question. You can use divining rods (which I considered and have used successfully in the past) or you can see how deep other folks around you have drilled that live around your home. The later was my method. Even with polling the other neighbors in the area there still was no sure guarantee of the depth to what we would drill too find water would be. Most of the folks around us drilled to about 400 feet of depth. There was one outlier that drilled to 1200+ feet and have had terrible luck with the quality of the water. At the end of the day you are paying for every foot that the well is dug. So when you have a well that is deeper than 400 feet, get ready to buy a car in cost.

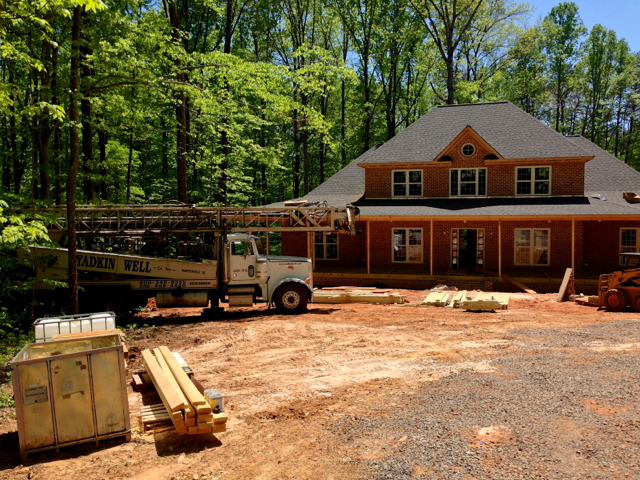
What did you pay for drilling the well?

The rates were all pretty close. Most of the companies I called had good reputations. The costs are basically $9-10 per foot for the depth of the well and then ~$5 per foot of casing. The casing can be either PVC or steel. The PVC casing is the $5 version while steel is $11+. There was not a single company that said steel would be needed and that PVC was just fine and never had any issues. And in case you were wondering what casing is, it is the top part of the well that basically keeps all of the dirt from falling in.

Overall cost?

For our well we went to 422 feet of depth and 95 feet of casing. This will amount to about $5000 without the cost of other county required items for code and for the well pump (about $350).

Final Analysis of Well versus County/City Water

In the short term drilling for water will be a higher cost than hooking up to the county system. In the long run though it does satisfy a number of our needs and will cost lower. Since our water pump will be eventually completely powered by solar it will not cost much to operate. We also will be able to insure the quality and taste of our water. We also will be able to guarantee that we will have water for as long as we need it. We also will not be limited to any county water restrictions due to drought or any rationing.  Overall the cost is a little higher, the gamble has paid off.


Green Framing

Framing a house: So how do you improve upon something that has been done for thousands of years?

Man has been building homes for since be beginning. Sod homes, log cabins, brick homes, concrete, tabby, single wide, double wide, manufactured and on and on. Always improving upon this technique time and time again. When it comes to the most current way of framing a house currently how do you maximized the insulation value? How do you rid the home as much draft and heat/cooling loss as possible?  Although relatively new in technique it still is not code for most of the US if at all (I have not checked codes of the US, but know its not code for our county).

The pictures posted show how you can simply increase the ‘R’ value of the walls. This also will reduce the amount of wood that is used in the framing of the home.

This is not rocket science and does not require special training by your Framer, but, a Framer who knows how to apply the best techniques to your home.  I was fortunate in that my Framer Buddy Meadows and his crew at Yadkin Builders put this in place. Buddy prides himself on being able to put the bet quality work into a project. He states “this will be the standard and code in 10 years”, and that would be the case especially for where we live.

The pictures below show how insulation can be maximized while at the same time the low value insulating wood will be minimized. This is critical with corners, walls, and doors that attach to exterior walls.

In addition to the best techniques being applied, Buddy’s crew was able to do a first rate job. They were diligent in doing thing right. What does that mean exactly? It means buying the best materials and choosing every piece of lumber board by board. And, when some of the boards that warp even after being installed, taking them out and replacing them with straight ones. This also means Buddy consulted with an Engineer on how everything comes together. Because of this diligence we now have an extra 1000+ square feet of potential build out space on our second floor.

Overall I am so very impressed with the work that Buddy and his crew have done. They are quality individuals that have worked hard and done a great job.


. IMG_2619 IMG_2617 IMG_2618

A Real Poopie Problem – Cloth versus Disposable Diapers

It is funny the reactions we get when we tell folks that we us cloth diapers. What immediately comes to mind is the image of ’70s with the baby in a big massive cloth diaper with huge pins holding it together. They also think of “what a mess!” and “What do you do with all the poop?!” That is not case with cloth diapers today. Thank God for good ole’ American Capitalism and Invention cloth diapers have a come a long way baby!

With the  birth of our baby boy a few years ago we looked into what to do for diapers. After a little research it was relatively easy to look into choosing some form of cloth diapers for him. There are a number of advantages that we saw for both our children, family and the environment.

What We Like About Cloth Diapers:

-Less impact on the environment

-Long term savings of cloth versus disposable

-The advantage of getting the kiddos out of diapers sooner

What is a Modern Cloth Diaper?

First, they are not the diapers you think of from the ’70s. They are not held together with monster sized safety pins. They do exist but I am sure not in use by many. There are a number of great cloth diaper companies out there. Out brand of choice is FuzziBunz. They are simple to use, easy to get on and off. They wear very well, and have lasted for over two years with changing a very hungry boy about five times a day. We have about 20 pairs of Fuzzibunz. The other component is the liners for the diapers. Modern cloth diapers have a liner that is absorbent of the pee and poop. These liners are designed to fit in the diaper but in reality and being lazy we usually just put them in the appropriate area. And also in reality we also double up the liners. The liner can vary in size and material. We have both a hemp and polipropeline/fleece type. The great thing about the cloth diapers is that they will grow with your kids. We have had the same set of diapers from infant to toddler. They have adjustable elastic in the lining that you can expand out as they get bigger.

So lets take a look at each advantage.

First the “Environmental Impact” of diapers. As you know we live in the country but also mindful of the crazy chemicals that are put in to all the cleaning and detergents that we use on a daily basis. The cloth diapers are certainly the way to go. Cloth diapers also force you to take care of the poop in a more sanitary manner. This manner is disposing of it down the toilet. There is debate that this is even the case for disposable but I found inconsistent articles on this. Either way it is better for human waste to go down the toilet.

When it comes to savings, cloth diapers are the biggest bang for your buck. We invested over $500 in reality with the purchase of the diapers and liners. There also is the added cost of electricity and water (perhaps gas too) that you will tack on by cleaning the diapers. And you will have to clean them almost daily if your kids are changes as much as ours. The added cost of the utility bills was pretty nominal and not enough that I even noticed. We do have the advantage of having an Energy Star or high efficiency washer to do the cleaning. We run the diapers on their own wash with extra settings of ‘sanitize’ and ‘heavy soil’ set. We are pretty diligent about running the ‘clean’ cycle on the washer about once a month to make sure the washer is clean. But all that said we have had no issues. Overall compare how much one spends on disposable diapers on a monthly basis and an investment of $500 bucks is pretty cheap.

The last point of getting the kiddos out of diapers quicker has proven to be a myth. The argument is logical in that disposable diapers are so advanced that kids do not feel the sensation of being wet. And, with cloth diapers they will feel wet to a degree and want to stop ‘feeling wet’, thus using the potty. Perhaps it is just him but our son has still yet to transition to using a potty as much as we have tried. We have taken the approach of ‘He will use it when he is ready’. We are about to resort to take the approach of ‘He needs to use it now, and we will bribe him with whatever it takes.’

Overall we are very happy with the cloth diapers. Some of the hemp liners have started to wear badly. Some of the diapers have shown wear and tear. FuzziBunz has been wonderful in replacing their faulty diapers with brand new ones. They have been a wonderful investment and one of the best decisions we have made. People are very pleased and amazed when the witness us breaking them out for a diaper change at a party or with company.

← Back

Thank you for your response. ✨

Warning
Warning
Warning
Warning

Warning.

Installing Tile in Your Home: Tile Store, Big Box, or Online

Bath Tile

Fancy Grey Tile. Accent Tile by Lowe’s

So we did a lot of research on buying tiles. Most of that research was on types and colors of tiles, not the tile buying process or who would lay the tile. Not focusing on the process or who was probably our biggest mistake that cost us over $700 in useless tile. To note we spent a lot more time doing research as we did not have a General Contractor that restricted us on who we used or where we bought. We felt the best savings and quality was with our own research. This information is for just such a person or who is acting as their own General Contractor.

Buying from a Big Box Store

My wife an I spent days looking at all the tile combinations. We brought home many sample boards and tried to mix an match the best we could. After all of the research we found the perfect combinations for tile and grout needed. We visited stores like Lowe’s and Home Depot. We ended up purchasing some of the tiles from both. The grout was from both stores. It was a very positive experience in that we found what we liked and could return what we did not need. A recommendation I would recommend for anyone that was not too picky about their tiles.

Net Notes on Buying from a Big Box Store:

-Easy to return tiles and other items (grout)

-Easy to buy more if needed (usually other stores around if they run out)

-Not always the best selection

-Good prices

Buying from a Tile and Flooring Store

Most of the tiles we purchased were from a local Tile and Flooring store, Bill Hege. Our salesman was very helpful and polite. He did an excellent job guiding us on the price of the tile. What was nice about the store and why we went back was due to the pricing was right up front. We were not looking for the most expensive tile and were trying to be as budget minded as possible. We ended up purchasing about $8K of tile from brands like Florida Tile. Our tiles were beige and gray for the most part of the order with some common beige flooring tile. Tiles in retrospect could have been ordered from Lowe’s. Looking back I would not have ordered this tile from any tile store period. It seems that many of the tile suppliers like Florida Tile have a no return policy on custom tile and at best they have a 25% restocking fee for any tile they do accept. I was really baffled by the inability to return tiles that were so basic in shape in color. How is a beige and grey tile ‘custom’? So you need to hire a tile guy who knows how to measure and measure accurately. I will discuss the installer later.

Net Notes on Buying from a Flooring and Tile Store:

-Broad Selection

-Usually Good Help

-Pricing is usually a guessing game

-No return policy on most all tiles and a 25% restocking fee on the few that are returnable

-It takes 5-21 days to order tiles

Purchasing Tiles Online

There were a number of tiles we purchased online. We found them much cheaper from reputable sites online. They did have all the caveats of restocking fees and the risk of getting the wrong tile. Overall we did have a very good experience. We saved a good amount of money over purchasing from the tile stores. Not everything was the cheapest and we erred on the side of purchasing our tiles from the store over purchasing online. One of the tiles that we ordered was mis-marked on the sample at the store and we ended up with the wrong tile.

Net Notes From Buying Tile Online:

-Good place to save some money

-Tough to return tiles if they are wrong color or tile

Finding a Professional to Install the Tile

Make sure you do your research on this individual or company. It is this person’s job to do the tile estimates and work with the Tile Store or you to provide a correct estimate. Go to a place like Angie’s List and avoid the trap we fell into and use the ‘good guy’ that the General Contractor suggests. Our tile installer was terrible at measuring. Something pretty basic right? Something part of your job as a professional tile installer? I should have done it myself. We ended up with over $700 boxes of tile extra due to his mistakes and my mistake of hiring this chuckle head. We also were lead astray on his estimate on how long the job would take. At the time of the posting this contractor is still not finished with the job. He also was requiring the highest end of the estimate. His estimate was for anywhere from $4700 to $5000. I was already asking for $5000 before being done. To note he was far over his time estimate and completely missed on ordering tile that we cannot send back. We still have the $700+ boxes of tile we cannot return. We have paid him $4500 to date and I yet to decide how if any more to pay him since he was so off on the ordering of the tile.

Net Notes for A Tile Professional:

-Look up their reputation on Angie’s List or some other site

-The Tile Professional is responsible for measuring the tile needed for the job.

-Get this agreement written in a contract


The New Home

And so it has begun. We have already been working on the new home. It has not quite 14 acres and a large pond on the site.

This is the land we plan to live out the rest of our lives. We will be building it with Green technology (Solar, Geothermal, reclaimed wood, etc). We plan to grow organic and non-GMO foods. We also plan to home school our children. We had the Architect design a home school room into the plans.

Just wanted this to be a simple post about some of the topics we will go into deeper in the days ahead.

The biggest challenge we had was looking for a home plan that fit the bill for a ‘Home School’. We found little out there for as far as designs for homes that suited our needs let alone for a Home School. We did find one Architect that had a number of plans that were on his sight. He had some wonderful designs but ones that just a little too large and costly for our needs.

The additional challenge was that we wanted a wrap around porch and a home not designed for a neighborhood. When I say ‘not designed fora  neighborhood’, we found most home designs on site were made for neighborhoods with smaller lots. Not for one with 14 acres in mind. This also meant that most were designed without window on the sides of the house facing the neighbors. Yes, we could put them in, but again most of these homes were designed on the interiors to have no windows either.

The other dilemma was that hiring an Architect for our needs was costly too. Architects usually charge a percentage of what the house will cost in the end. This bill would have been over $10,000 for our home and just not worth the money. We are not that picky in our needs. We also felt that we were not designing a huge massive custom castle. Just a home with a few specific needs.

The ‘Wants’ for the New Home

Overall our needs besides the porch were we wanted to ideally have the whole living space on a single story. We were tired of going up and down stairs on our last home. We did allow for the Home Schooling room to be on the second story. We also wanted to downsize from the 3500+ square feet in the last home. We felt it was too much room for us currently and in the future. And, too much to keep up with. We do not have a cleaning service or lawn service. Our family is small with just a toddler and perhaps one or more on the way. So the new home is a little over 2500 square feet plus a 500 square foot Home School room. The garage is about  2 1/2 cars in size.  We love to cook and wanted to have an above average kitchen.  Not a kitchen with Wolf or Viking appliances but ones that were practical in cost and could hand serving a number of folks.

So what did we do?

We ended finding some plans that we liked and mostly fit the bill by about 75% and hiring an Architect to adjust the plans. This was a local Architect that had a full time job at a firm and worked on our plans on the side. The cost of changing the plans was $1300. His cost would have moved up if we made some massive changes or made him change after every draft. We only changed our house plans really twice during the process. And even after the final we are making a few changes along the way that I will go into more detail later. But overall a huge savings in money.

This Is Just The Beginning!

Welcome to our blog! This is just the beginning!

Our family is a little different. Perhaps a little weird some might say. We don’t quite fit into most definitions of what is ‘normal’.

Sounds like we are really weird or you think “I can completely relate!” If you think the latter, this blog might be worth your time.

We have traditional Christian values. We are financially and personally Conservative in values in politics. We do not value the fiscal and many principals of Liberals. Life is hard work and nothing is free. At the same time we go against the grain in that we live our lives in building a home that is utilizing Green energy and resources.   We recycle and compost like fiends. We believe 100% in Organic and not eating GMO food. We try our best not to eat meat that has not been butchered or treated in a humane way. We are fortunate that we are able to spend extra money on organic, free range/roaming and non GMO food, but, we believe that this is how God intended us to live. We also believe that is has contributed to our health for our children and ourselves.

We believe that there are more folks like us out there. We run into them everyday.

What will you read about in the blog?

We read blogs and information out there that helps us guide our life and decisions we make for our family every day. In a way it will be a good repository for ourselves and perhaps others.

We have begun organic gardening a few years ago. We have purchased about 14 acres of land that we plan to plant whatever we can grow. Along with raising chickens and other animals. We have a large pond on the property that is already stocked with fish. And with this we are building our dream home where we will home school our children.

So the post may be about the home build. We are trying to make a Net Zero home  but at the same time make it affordable and practical. For now here are some of the topics we will cover:

-Building an Affordable Green Home

-Home Schooling

-Organic Gardening

-Healthy Organic and non-GMO living

-The Occasional Political Item in the News

This is going to be an exciting year ahead! Please visit back to see the latest updates.

← Back

Thank you for your response. ✨

Warning
Warning
Warning
Warning

Warning.